Tuesday, February 24, 2015

Weld weld weld

I was going to ride Sunday as we'd had some more snow but I came out to find this:

whoops. It turns out my old trailer is pretty rotten underneath. The frame the springs attach to is solid but the pieces that span between that and the side rails are all bad.

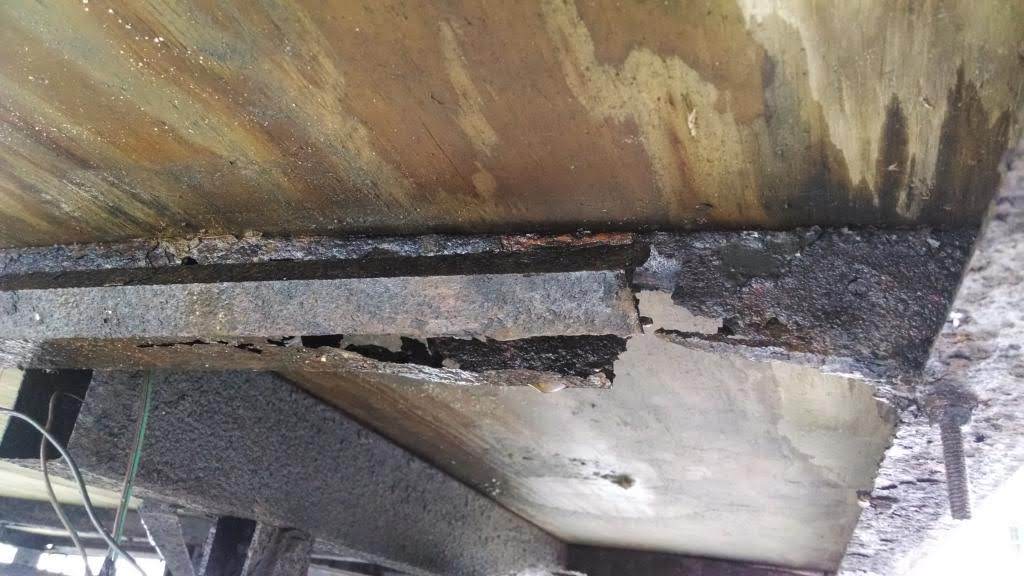
You can see in this pic that the previous owner had done some repairs with pieces of angle iron in the past.

I'm debating if I replace this trailer or buy some steel and rebuild it. I'm pretty much 50/50. Ben has an enclosed trailer he's talking about selling. I'd been talking about an enclosed trailer anyway, it would keep my nicer sleds from degrading over the summer like they tend to do when left under tarps so that would be a good option. On the other hand if the only thing this trailer needs is three or four pieces of steel I'd be a fool not to replace them. At the very least it would make the trailer valuable enough to sell or take to camp where we could use it as a utility trailer. For now I won't be taking it very far from home.


Anyway I welded a strip of steel from the angle iron to the side rail and then welded the light mount to that. Its not terrific but it'll get me through the rest of this season.

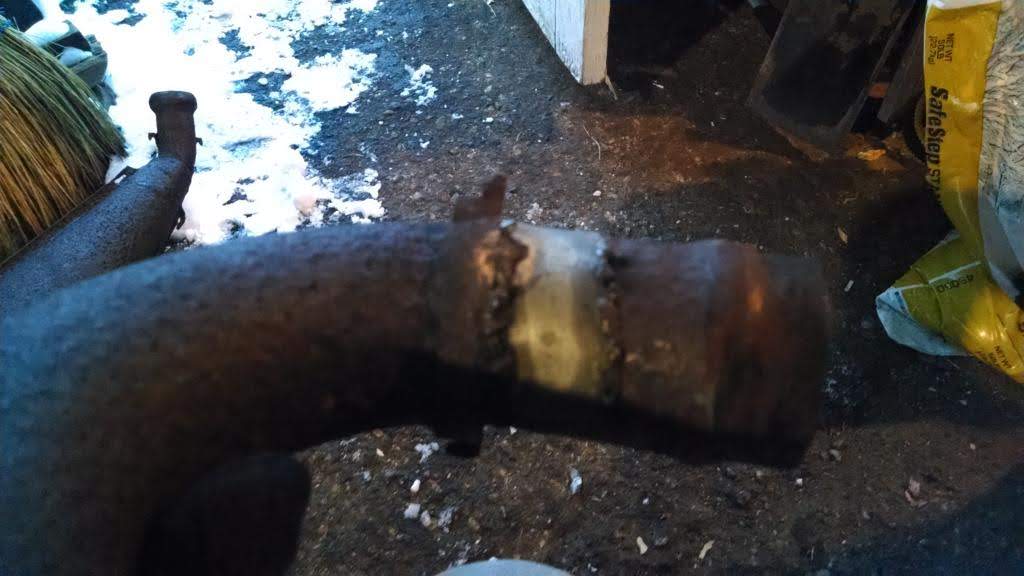
With that done I spent some time welding up the pipe for the Ski-Doo. When I was riding Saturday it popped and got louder. I found a bunch of pinholes in the main pipe, mostly around places I'd welded before. That pipe is looking like the Frankenstein monster. I cleaned up those welds and added some filler. I also fixed a spring hook that had broken. I need to finish out by pulling the last part of the can and rebuilding its flange to the next piece up stream. I managed to do a similar repair on another piece that came out nice. If nothing else this kind of work helps me become a better welder.


Tuesday, February 17, 2015

A little light Jag repair

The Jag has been a great sled but theres a couple things bugging me about it. One was a spot on the windshield I managed to crack with just a tiny tap on a tree. Today I took the time to put some packing tape on the crack.


This was more challenging than I would have expected because the Windex I was trying to use to clean the windshield before I taped it kept freezing... Got it there eventually and now I'm thinking that it looks good enough I might leave it that way. I'd been thinking I'd buy a new windshield but they're kinda expensive and will just get broken eventually... Maybe when I take this one off in the spring I'll re-enforce a little where I couldn't get to with it mounted but I think its staying.

I've also noticed the sled getting a little louder. Theres a gasket where the manifold meets the muffler and surprisingly Troy Arctic Cat actually had one so I replaced it:

New gasket installed


The old one didn't look too bad and I didn't notice much difference in my test runs but it seemed like it didn't get loud until I'd been riding for awhile. I wonder if the old gasket was letting exhaust by when it got hot...

Finally the kill switch doesn't work. Arctic Cat used a kind of pain in the ass system to shut the sled down if the carbs get stuck open. When I bought the sled it was bypassed with a nice jumper but I've had a couple cases this year where the carbs have been a little sticky and I'd like to have the kill switch back so I spent some time looking at it.

The system is interesting there are switches in the carbs and two switches at the throttle lever. One of the throttle lever switches is activated when the lever is all the way back, when you move the lever that switch opens and the other closes. The sled won't run if one of the switches isn't closed all the time. The idea being if a carb was stuck open the cable would be slack and neither switch would be active thereby shutting the sled off.

I spent a bunch of time playing with adjusting carbs because I thought I was getting caught in the transition period between one switch opening and the other closing. It turns out the first switch is never closing:


If you look directly below where the cable mounts to the throttle lever theres a hole. That hole is directly against the first switch (visible to the right of the ferrule the cable goes into) so nothing ever pushes against that switch. I've asked about it over at vintagesleds.com but I think what I'm going to do is find a set screw that fits into that hole and wind it in so that it just pushes on that bottom switch. While I'm at it I should see if I can fix the thumb warmer, that'd be nice to have...

Sunday, February 15, 2015

And sometimes this happens...

We got another 10.5" of the blessed white stuff last night which managed to wipe out all the tracks in the yard. That of course needed to be fixed so I fired up the '91 Jag for a good rip. 10.5" is good deep powder but the Jag just eats it up, no problem at all so full of confidence I hit the trails for one of my pirate runs.

Nobody had been through since I went last week and even then I'd only made one pass out and back which doesn't make much of a trail. About 200 yards in I found a 5 FOOT deep drift, fortunately it descended to only 3 feet at the left side of the trail, unfortunately that was right next to a tree. I split the difference and blasted through a 4 foot wall of snow, had no choice really, there was nowhere to turn around and I didn't dare stop for fear I wouldn't be able to get going again.

With that behind it was a hard but slow run to where I leave the railbed and cross to a parallel trail. I was nervous about this because its a tight area and wasn't sure if I could keep headway but the Jag just kept slogging along. Finally got to where I could turn around, decided I'd do a clockwise turn but suddenly realized there was a deep spot right where I was headed, reversed course and ended up foolishly getting off the power and hitting that deep spot heading the other way...


I commenced to digging. This was a learning experience, with older sleds that have no rear suspension travel you heave the back end over to the side, fill in the hole under the track, heave the sled back on top to pack the snow, then back off and repeat. With a sled like my Jag that has some rear suspension you dig out under the footboards the length of the sled, then sit way back on the seat and apply power, the track hopefully finds traction and you're out. I had to try the old method once before I realized the new method would work better.

Here's a look at how close I was to completing the turn:


I think my mistake is that I thought I was going to stay in the seat through the turn, I should have been standing on the left footboard. I also realize now that I should always plan on a counter clockwise reversing turn when I can manage it because it'll be easier to stay on the throttle through the turn. In a right turn it gets hard to pull the throttle since the right grip is now down by my right knee.

Ahh live and learn right? The good news here is that since the Jag is such a good powder sled I feel much more confident about trying to make it to our camp in Maine in the winter. The camp is 3/4 of a mile from the road with no trails kept in the winter so we'd have to break trail through what would probably be powder similar to this.

I took the Jag yesterday into the state park and rode the groomed trails, it rides good but fishtails something awful. I'd decided that it needed a new track but considering its powder performance it might just need studs. Actually if I could get a deeper lug track AND studs and slightly wider plastic skis this would be an amazing powder machine...

Saturday, February 14, 2015

Working with the groomers

Suddenly I realize I've been remiss in telling you about riding with the groomer...

As with all clubs the Coldbrook Snowmobile Club is basically run by a small group of people who do all the work. I've seen this a bunch of times in a bunch of different clubs. Not wanting to be a freeloader some years ago the last time I was part of the club I got in on a work day and helped prep one of the groomers. That was kind of cool but just a one time thing.

This year I thought I'd help out with the actual process of grooming. Technology has progressed and the club has a Facebook page, I got on there and found that they were looking for people to help out so I volunteered. Last week I met up with Chris and rode in the ASV on the southern run. Last night I rode with Ben in the Pisten Bully in Lake Dennison State Park.


The ASV is a fair sized machine, maybe the size of a family sedan, the Pisten Bully (pictured above) is a brute the size of a box truck. The blade is about eight feet across and its sports a 200HP Mercedes turbo diesel engine. The guys say that grooming is "like watching paint dry" which is more or less true. Its a bit like snowmobiling very slowly, the machines creep along at about 6mph. Its also a bit like plowing snow but backwards. Where your average snowplow pushes snow off the road the groomer's job is to pull snow into the trail, both to fill in the low spots but also to build up a base.


Here's some of Ben's handy work, even after half a day of riding it still looks real good.

I don't know yet if this is going to end up with me actually being a groomer driver. I'd guess I'll be a backup, it seems like they've got enough actual operators right now. It also takes a long time to get qualified to operate a machine, about 2 years. The reason for the long training period is that the groomers only really run about 100 hours a year which if you think about it is really only 2 and a half 40 hour weeks, it takes time to get proficient. Honestly I could probably run either of the machines through the woods right now and keep the drag on the ground but theres so much more to it, theres knowing how to fill holes, which high spots to cut and when to leave them alone. How to raise the drag before the top of a hill so you don't scrape the snow off and when to drop it on the back side. 

Ben is a great teacher and I started to absorb some basic theory last night but clearly I've got a long way to go. I've also got to learn to deal with problems that show up, the machines are generally pretty old and stuff breaks so you've got to be self-reliant. I'd like to think I've got an advantage there but I bet I really don't. These guys are mostly blue-collar folks who have real jobs where they work with their hands and tackle mechanical problems all the time. Being a "thinker" I'm way behind on that front and have to work harder to make up for it.

Anyway I don't know where this is going to lead other than to some late nights, last night I met Ben at around 6pm and headed home around 12:30am which was better than the week before when I met Chris at 6:30pm and headed home at 2am...

Thursday, February 5, 2015

Progress!

Finally got my shipment from Dennis Kirk so work can progress.

The puller that I bought for the Pantera doesn't fit perfectly, the smaller 6mm holes don't line up perfectly with the holes in the magneto. Fortunately the larger holes line up well enough that the 6mm (grade 8) bolts would thread into the magneto. I added a little grease to the pulling bolt to reduce friction, then tightened it up. The puller has a cool little rod to keep the engine from turning. Or rather it USED to have a cool little rod to keep the engine from turning, that promptly broke off.

I barely put any torque on it at all. So I put the rope back in the cylinder and whacked the end of the puller a couple times. Then added a little more tension and "CLANG!" I thought I'd broken the puller but:

The magneto popped right off. While I was on a roll I bought a #3 phillips head driver, chucked it into a 1/4" socket and pulled the screws holding the PTO side plate on. I'd tried with a #2 phillips before but I couldn't apply enough torque to break the screws free.
Now I need to haul the engine back into the basement to replace the seals.

After taking the dog for a walk I went back to the Wankel Panther. I cleaned the mag side crank shaft really well and lubed it with axle grease, I also greased the shaft and held the o-ring in place with yet a little more grease.

I briefly considered some hylomar for holding the o-ring but was to lazy to go back into the house for it. The grease will melt out the first time the engine gets good and warm and won't cause any trouble. There was no o-ring there at all before so this has to be better...

The grease kept the o-ring in place perfectly allowing for easy installation which I strangely didn't get a picture of.

Getting the stator in place correctly took more time than I would have expected. I managed to get it not seated fully on one side which made the magneto hit, glad I rolled it over a few times before I buttoned everything back up. It turned out I had some wires trapped, once I got those aligned correctly everything went together easy.

I quit while I was ahead since I couldn't find my multi-meter. I want to check to be sure the points are opening before I button up the engine.