Headed out to the garage tonight all ready to pull one of the carbs and clean it within an inch of its life. I decided I'd start with the mag side and pulled the choke cable. Thats when I noticed how little slack there was in the choke cable which prompted me to remember how the choke lever had felt weird yesterday. I pulled the other cable and it seemed short too. I followed the cables back to the lever and found the back had popped off and pulled back on strangely so the choke was always half engaged. Got that re-arranged, got the cables back in place, fired the sled up and it still ran like crap. For some reason I kept it running and after maybe a minute it make a little noise and idled perfectly!
I think that yesterday in running with the choke on I'd loaded some gas into the bottom end of the engine and what I saw today was that burning off and once it did the sled running right. It was late when I started so I didn't want to run the sled too much, make a bunch of noise and piss off my neighbors but I'm pretty pleased.
Unfortunately I noticed the headlight is out, I put my trouble light on the line to the seat and it lit up so either the bulb is burnt out or disconnected. I wouldn't be surprised if its burnt out.
Anyway I decided that since the carbs don't have to come off (probably) I'd put the seat on. That was an exercise in frustration. Here's a free hint that I should have already learned from farting around with the Ski-Doo, test fit the plywood before attaching it to the seat. I didn't make the cutout at the front deep enough or wide enough. Now I need to take the seat apart again, recut the base and reattach. I'll definitely trial fit the base before I reattach the foam though!
Anyway, getting closer, nearly there!
Tuesday, January 29, 2013
Monday, January 28, 2013
One other note on brakes
I got chastised by the boys around the table of truth over on the Yahoo Group "Vintage-Snowmobiles" for adding DOT 4 brake fluid in my Cobra. Apparently it originally came with DOT5 and as DOT 4 and DOT 5 are not interchangeable or even compatible my using DOT 4 is bad mojo. I'm reasonably sure what came out was DOT 4 as one of the guys says DOT 5 is usually tinted.
Anyway on Saturday I picked up a bottle of DOT 5, they sure don't give that stuff away! I pulled the drain at the caliper and mopped out the master cylinder. Then I refilled with DOT 5 and left the plug out of the caliper until only purple DOT 5 ran out. Its handy that its tinted... With any luck since I only topped up with DOT 4 it won't have had time to hurt anything.
This whole incident makes me wonder if the leaking brake on my TX-L was inadvertently caused by my use of DOT 4...
Straighten out!
Dug into the steering on my '79 Polaris Cobra today, the tie rod was bent badly:
 It was a bugger to get out, had to shift the engine out of the way... I bent it back straight using an old brake disc as a mandrel and my 3# hammer to finish it, got it pretty good but apparently forgot to take a picture.
Installation was no big deal and I moved on to welding up the turn stop. It'd been welded, maybe several times before and I had to grind off a lot of old weld. Then I learned what the last welder knew, its a hard spot to weld in, the engine is really in the way, this is something that should be done with the engine completely out of the sled. Anyway I got it welded back on, its such an ugly job I won't post a pic, just know that its there!
So finally all ready I took it for a shake out ride before installing the seat and found its bogging badly on the low end, won't idle good once it warms up either and when it quits won't restart unless I hold the throttle wide open. I'm guessing I didn't get one or both of the carbs clean enough when I cleaned them. Interestingly this is similar symptoms to my Pantera. I'll have to pull the carbs and do a better job this time...
I also noticed that the sled doesn't seem to shift gears, which is to say it doesn't seem like the secondary clutch is opening. That said its really hard to tell what with the short space I've got to run it in my yard and the problems with the carbs. The secondary moves, I've had it open a couple times to remove and re-install the belt. I'll lube it good and see if that helps.
Oh well, one step forward, one step back. Fortunately we're closing in on the finish!
Take a seat
The seat on my 1979 Polaris Cobra was basically trashed. The cover had pulled back from the base which is a pretty common problem, and the sled had been left outside. That had caused the foam and wooden base to get totally saturated with water. I let it sit near the woodstove for a few days which got it basically dried out but the wood base was totally ruined. So I got a sheet of 3/8" plywood (which will help me with the '70 Ski-Doo as well) and cut out a new piece. Its actually a fairly complicated shape, it needs to fit around the light assembly at the rear and then around the lip that holds it up front. Plus there need to be two holes to attach at the rear. I painted the whole thing in a thick coat of black Rustoleum which makes it look original and should protect the wood. If I get another 30 years out of it I'll be satisfied. :)
The original base was molded into the foam so getting them apart without destroying the base (which I needed for a pattern) took some doing. When done I'd cut the foam in a couple places. I glued those back together and then glued the base onto the foam to keep them from sliding apart. Finally I wrapped my new seat cover over the top and stapled it to the base.
I bought the seat cover on eBay and I'll warn you that there are 2 versions, 1 is black, one is blue. I didn't notice that until I'd bought and received the black one. The original cover was blue. At this point after I'd cut the cover to make a hole for the taillights I'm not going to spend the money to get the correct one, after all it gives me a story to tell.
Anyway, once I get the rest of the sled completely ready (which means fixing the ski that only makes right turns) I'll mount the seat, but at this point I'm so close to being done I can taste it! If we only had some snow...
Friday, January 25, 2013
Whoops!
After coming to grips with the grips I decided it was a good time to take the Cobra for a rip around the yard. I'd had a little difficulty getting it started but considering it'd never really run enough to warm the engine up properly I'm not really concerned. This would also be the first ride since freeing up the brake, on the maiden voyage the sled was dragging badly because of that brake.
So the good news is with the brake released everything feels pretty spritely. The bad news is this:

Turns out the stop which should keep the ski from getting into that position is broken. It looks as though it was broken and rewelded poorly at some time in the past. Further forcing the ski back into place has bent the tie rod so that the right side ski is perpetually turning right. I'll have to fix the stop and straighten or at least shorten that right side tie rod to fix it.
On another note the seat is nearly ready. In getting the seat foam dry I finally had to resort to ripping the plywood base off. It was soaked and badly degraded. I got another sheet of plywood (which will help me with the Olympique too), cut and painted the base. Now I'm just waiting for it to dry before I finish. I'm debating gluing the base to the seat. Not sure what to do about that.
Got my grip on!
Last jobs on getting the heated grips wired up were to connect ground and power. For ground I pulled one of the screws that holds the handlebars in place, the Polly Heater grips come with a ring terminal that fit perfectly though I should have shortened the leads a little before crimping it together.
Finally for the hot lead there was a wire with a banana plug lying next to the fuel filter which was t-tapped into the voltage regulator. My test light show it was hot, I ran it through a 4a fuse to the switch.
I couldn't get the spade lugs Polly Heater provided to work with the wires since with the exception of the hot lead you're connecting 2 wires at a time so I used some other larger (and more protected) ones I had.

With everything connected I fired up the sled and flipped the switch, the headlight dimmed so clearly 2 things are true:
- Everything is wired up correctly
- The electrical system is marginal for these heaters.
Wednesday, January 23, 2013
Work continues
Got just a few minutes to work on the Polaris today, got one more fuel line cut and installed. I'd started this last weekend but ran out of zip ties. I always zip tie the fuel lines on since the time I had them fall off the El Tigre while I was riding...
I tried to reinstall the left carb which I'd removed Sunday to install a jet I'd accidentally left out. I'd left the carb off because it made it much easier to install the fuel lines but I found with the carb boot cold (about 5F) I couldn't get the carb to go into it, the rubber was too hard.
So I'm kind of stuck, I can't finish wiring the grips until I can run the sled to prove the wire I think should be a hot lead really is. I can't run the sled until I get the left carb installed and I can't get the left carb installed without it being warmer. I dare not run a heater near the carb boot because the left fuel line is disconnected and I don't want to start a fire. Until I figure out how to warm that carb boot up I'm sunk.
On the seat front I finally had to tear the plywood base off the seat, it was holding moisture like crazy and I didn't want to install the seat with the new seat cover knowing I'd have to redo it soon. Although in the spring I still want to pull the seat, sand the tunnel and repaint. Clearly the moisture buildup there has been a problem for some time. Unfortunately I don't have any 3/8" plywood on hand and Angie took the pickup truck to work today so I could put the snow tires on my car. Tonight I'll plug in the car's block heater (its supposed to be below zero tonight) so she'll have no excuse not to take the car tomorrow.
Saturday, January 19, 2013
Arctic Cattin around
My '78 Arctic Cat Pantera has been sitting for a couple weeks now, I took it for a ride after our first snow of the season and on the way back decided to open it up and "blow out the cobwebs". That turned out to be a big mistake, as soon as I got to full throttle the sled bogged and died. I got it started again but didn't get far before it quit again. Rinse, lather, repeat.
Finally I called Angie to come get me and we towed the sled home the last half mile with the pickup. What an inglorious way to arrive. The sled restarted easily and seemed to be back to running normally until I once again went for full throttle. This time when it died it stayed that way.
Finally today I got a chance to get out and clean the carb, in doing so I found a mouse nest in the airbox. Clearly when I went for full power I pulled crud into the carb... Wasting no opportunity I shot a video as I cleaned, hopefully in a week or two I'll have it up here for you to see.
So now the sled runs, it doesn't idle well though, I can't tell if thats watery gas or if I didn't get the idle jet clean enough. I may just run it a little more and see if it cleans itself up.
Friday, January 18, 2013
Coming to Grips
The mailman delivered my new Poly Heaters grips today so even though it was 10F in the garage I knew I needed to put in some time.
Outside grip Poly Heaters are nice because they're easy to install, slide 'em over the bar, drill a 1/8" hole, install a screw and you're done. If they need to come back off its no big deal, especially if you spray the bar with something like WD-40. Normally WD-40 is something to avoid, its not a lubricant although most people use it for that purpose. In this case it makes a nice water seal between the bars and the grips and it dries to a film that sticks around and resists rust a little.
I had to spend a little time on the throttle side because at full throttle the grip would grab the thumb throttle a little and hold it wide open, obviously not something I want to encounter on the trail! A few seconds with the drum sander in my rotary tool plus installing the throttle side grip a little farther out cleared up the interference issue and I got both grips installed.


I routed the wiring for the heaters down the bars with a couple zip ties and found there was already a hole drilled to install the switch near the keyswitch.

Here you can see the switch for the heaters installed between the keyswitch and the choke control. Its not wired up all the way yet, I wired from the heaters to the switch but I still need to figure out where my ground is coming from and where I'm going to pick up power. Theres a wire tapped out of the voltage regulator already which I suspect will provide ground and ground shouldn't be too hard to come up with. Before I do anything else though I need to get a fuse to install between the switch and the power lead. There aren't really any fuses on this sled at all as it has such a simple electrical system and I don't want a shorted heater to burn my sled down...
Thursday, January 17, 2013
BRAKES!
Got to spend some time in the garage the other night, one of the problems with the '79 Polaris Cobra is the lack of brakes. The brake caliper on this system has 2 pads, one the caliper pushes against another which stays still in the caliper. Polaris has long used hydraulic brakes and in this case the driven pad is hydraulically actuated and on my sled that pad was stuck.
I found that using a big screwdriver I could pry the pad back away from the disc but when I applied the brake and the pad moved back in it would be stuck against the disc again. I pried and applied and pried and applied and while it seemed like it was getting a little better I wasn't gaining much.
Realistically I knew I needed to pull the caliper and properly clean everything. Unfortunately on this sled the brake caliper is attached to the chaincase inboard of the driven clutch. The driven clutch has to come off for this to happen and the chaincase has to come apart for that. I got as far as opening the chain case and pulling the chain and top sprocket before I gave up. Fortunately with the top sprocket removed the driven clutch can turn since you're not trying to push the track which helped with freeing the pad.
Finally in desperation I carefully squirted a little PB Blaster around the edge of the pad, now when I worked it back and forth I could feel it getting looser and eventually I could apply the brake and it would release easily. With that accomplished I sprayed some brake cleaner on the pad and disc so the PB Blaster wouldn't grease the brakes and everything seems good.
Its a good feeling to make progress.
Saturday, January 12, 2013
Back from the dead
This blog isn't the only thing back from the dead, today I managed to revive the '79 Polaris Cobra!

Apparently my points cleaning was good enough, this afternoon I got some fresh gas, put the exhaust back in place, drained a gallon of varnish out of the tank, primed the carbs with a squirt bottle and it fired right up. Strangely I noticed I wasn't getting any gas from the tank, a little troubleshooting later and I found:

What you're seeing in my hand is the bung that goes in the tank. To the left there should be a piece of fuel line with a brass filter and check valve. The lack of fuel line means gas could only come out of the tank when it was full.. I took a run down to the sled shop to pick up some new fuel line and the check valve. With that installed and a little more prime the sled fired up and ran nice. I ran around the yard a couple times but its very warm and our snow is like oatmeal, very slippy and hard to ride on, fortunately the long track on this sled helps with that.
After my short ride I pulled in front of the garage and gave the sled a bath, it looks a lot better with the worst of the grunge off. It needs spraying down but my hose is unusable until spring. In the spring I'll wash it again and polish/wax.
Still on the to do list:
Free up the brake
Inspect the suspension - there doesn't seem to be any suspension travel at all right now. Considering how rusty the ski shocks are I suspect the skid shock is dead.
Recover the seat - I ordered a replacement seat cover on eBay
Replace the grips - Amazon is providing Polly Grips which are the same heated grips I had on my Centurion.
All in all not a bad day. If the sled still starts tomorrow I'll consider it a major win.
Bought another!
Well friends its been several years now since the Dead Sled Wrencher has bought a new machine but here we go again, once more into the breech!
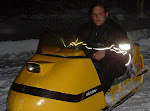
My 37th birthday is coming up and I'd decided I was due a present, I'd found a '73 Pantera online but luck was not with me and it was sold before I could get to it. Then fate took me to the New Hampshire Snowmobile Museum classifieds just minutes after the posting of a '79 Polaris Cobra 340. I contacted the seller and we made the deal.

Thats a before picture in the seller's garage. The sled hadn't been run in a year which is no big surprise as we had almost no snow last year so the carbs will of course need to be cleaned. More vexing theres no spark. This is a magneto ignition sled which means breaker points. Back years ago lack of spark on a breaker points system was why I had to get rid of my '76 TNT so I'm a bit gun shy...
Over the next two days I spent about 4 hours cleaning, cleaning, cleaning the points and managed to get spark so last night I pulled and cleaned the carbs, they were as nasty as any I've ever seen.
With that done its all ready to start I just need to go get some fresh gas and give it a try.
A few other notes, the seat cover is ruined, fortunately theres a seller on eBay who is manufacturing new covers. The grips are for a dirtbike or ATV, I plan to replace them with Poly Heaters. I had a set of those on the Centurion and although I never wired them up for heat they were comfortable grips.
Finally theres no speedo, the seller supplied one but no cable or speedo drive, again theres one on eBay. That said I'm not buying anything more until I'm sure the sled will run...
Sunday, January 6, 2013
Props for Spaulding Vintage
I mentioned the new seat tabs in my last post, I picked them up From Spaulding Vintage Snowmobile online at http://www.spauldingvintagesnowmobile.com and they're fantastic!
The whole process was great, I ordered online just before Christmas the parts arrived just after Christmas and they're exactly what I expected. Shipping was CHEAPER than actual, he charged me $1.29, actual was (from the USPS label) $1.92. In a day when so many places make a profit on shipping its nice to see somebody who doesn't cheat you.
I'll definitely be ordering from Spaulding again, they have a tunnel repair plate should I need one and I definitely need the rubber strip that holds the windshield down. Speaking of which I may go order that right now!
One step forward, two steps back
Got some spare time yesterday to start welding the old '70 Ski-Doo back together. This is the first work I've done on this sled since 2008 and its sorely needed.
First I pulled the old seat tabs off. The old tabs were held on with screws which of course means each leaves behind two holes in the tunnel so step one was to weld the holes back up. This is kind of a fiddly job involving a small rosette weld. With that done I welded on the two front tabs:


First I pulled the old seat tabs off. The old tabs were held on with screws which of course means each leaves behind two holes in the tunnel so step one was to weld the holes back up. This is kind of a fiddly job involving a small rosette weld. With that done I welded on the two front tabs:

Today I went out to test fit the seat and ensure the spacing was correct, I'd only tack welded the tabs in case my spacing was off. I rapidly discovered that although my spacing seems good the board I used for the seat base is too thick and the tabs won't fit it. I used 1/2" plywood which I thought was the same as what was there, apparently it was originally 1/4" ply.

If you look carefully at the picture you can see that the top of the tab just barely pokes through the ply. Part of the problem is that the wood is thick, the other part is that there are stiffening ribs that run perpendicular to the tunnel which raises the wood a little. This raising is actually a good thing because it means that the bottom of the wood has a chance to dry and not rot out as quickly. To help that I've polyurethaned the wood within an inch of its life and just before I install the seat I'll wax the wood which should help it shed water even better.
With the seat not fitting I didn't know what the problem was and still didn't know if my spacing was any good so I removed the million staples that hold the seat base to the seat so I could look. In reality I shouldn't have attached the base to the foam before making sure the tabs fit right...
So my options are to bend the tabs until the seat base fits right, go with a thinner seat base, or put the tabs on spacers. I measured and played and found some 1/8" strap steel in my garage that will make the perfect spacer. So I'll weld the tabs to a scrap of the 1/8" steel and weld that to the tunnel. Further investigation reveals I had the tabs 1/4" too far forward anyway so its a good thing I didn't finish weld the tabs in.
Before anybody says anything, yes the paint I put on the tabs is a terrible match, I had some Cub Cadet yellow that is a much better match but I can't find the stuff so thats just Rustoleum to keep rust at bay. You'll also notice the tunnel is very rusty. I'm thinking this summer to strip the whole chassis down to nothing and have it sandblasted and repainted. That might require the tunnel top be replaced but we'll see...
Subscribe to:
Posts (Atom)